| openshift/templates | ||
| views | ||
| .gitignore | ||
| package.json | ||
| README.md | ||
| server.js | ||
Node.js sample app on OpenShift!
This example will serve a welcome page and the current hit count as stored in a database.
OpenShift v3 setup
There are four methods to get started with OpenShift v3: running a virtual machine with Vagrant, starting a Docker continer, downloading the binary, or running an Ansible playbook.
Vagrant into a Virtual Machine
One option is to use the Vagrant all-in-one launch as described in the OpenShift Origin All-In-One Virtual Machine. This option works on Mac, Windows and Linux, but requires that you install Vagrant running VirtualBox.
Running a Docker Container
Another option is running the OpenShift Origin Docker container image from Docker Hub launch as described in the Getting Started for Administrators. This method is supported on Fedora, CentOS, and Red Hat Enterprise Linux (RHEL) hosts only.
Downloading the Binary
Red Hat periodically publishes OpenShift Origin Server binaries for Linux, which you can download on the OpenShift Origin GitHub Release page. Instructions on how to install and launch the Openshift Origin Server from binary are described in Getting Started for Administrators.
Running Ansible
Outlined as the Advanced Intallation method for poduction environments, OpenShift Origin is also installable via Ansible playbook made avaialble on the GitHub openShift-ansible repo.
The project
After logging in with oc login (default username/password: openshift), if you don't have a project setup all ready, go ahead and take care of that
$ oc new-project nodejs-echo --display-name="nodejs" --description="Sample Node.js app"
That's it, project has been created. Though it would probably be good to set your current project to this (thought new-project does it automatically as well), such as:
$ oc project nodejs-echo
The app
Now let's pull in the app source code from GitHub repo (fork if you like).
create
$ oc new-app https://github.com/openshift/nodejs-ex -l name=myapp
That should be it, this form of new-app will locate an appropriate image on DockerHub, create an ImageStream for that image, and then create the right build configuration, deployment configuration and service definition. Next you'll be able to kick off the build, though new-app will kick off a build once all required dependencies are confirmed. The -l flag will apply a label of "name=myapp" to all the resources created by new-app, for easy management later.
Check the status of your new nodejs app with the command:
$ oc status
Which should return something like:
$ In project nodejs (nodejs-echo) on server https://10.2.2.2:8443
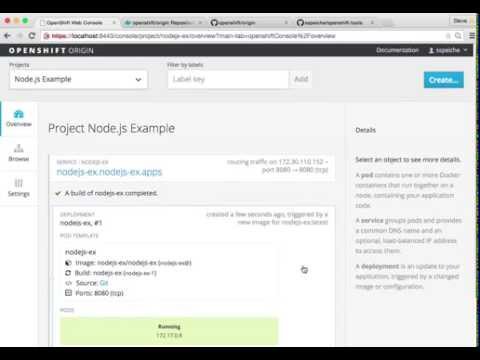
Note the address, as yours may differ. This is the address for the web GUI console. You can follow along with the web console to see what new resources have been created and watch the progress of the build and deployment.
build
If the build is not yet started (you can check by running oc get builds), start one and stream the logs with:
$ oc start-build nodejs-ex --follow
You can alternatively leave off --follow and use oc build-logs nodejs-ex-n where n is the number of the build to track the output of the build.
deploy
Deployment happens automatically once the new application image is available. To monitor its status either watch the web console or execute oc get pods to see when the pod is up. Another helpful command is
$ oc get svc
This will help indicate what IP address the service is running, the default port for it to deploy at is 8080. Output should look like:
    $ NAME        CLUSTER-IP       EXTERNAL-IP   PORT(S)    SELECTOR                                AGE
    $ nodejs-ex   172.30.249.251   <none>        8080/TCP   deploymentconfig=nodejs-ex,name=myapp   17m
route
An OpenShift route exposes a service at a host name, like www.example.com, so that external clients can reach it by name.
DNS resolution for a host name is handled separately from routing; your administrator may have configured a cloud domain that will always correctly resolve to the OpenShift router, or if using an unrelated host name you may need to modify its DNS records independently to resolve to the router.
As of OpenShift v3.1 routes can be configured in the web console or via CLI. Using the CLI, you can expose a route as follows:
$ oc expose service/<name> --hostname=<www.example.com>
If you're running OpenShift on a local machine, you can preview the new app by setting a local route like:
$ oc expose service/nodejs-ex --hostname=10.2.2.2
enjoy
This example will serve a welcome page and the current hit count as stored in a database to http://10.2.2.2.
update
Assuming you used the URL of your own forked report, we can easily push changes to that hosted repo and simply repeat the steps above to build which will trigger the new built image to be deployed.
delete
$ oc delete all -l name=myapp
To remove all the resources with the label "name=myapp".
Debugging Unexpected Failures
Review some of the common tips and suggestions here.
Web UI
To run this example from the Web UI, you can same steps following done on the CLI as defined above by The project. Here's a video showing it in motion: